Our first voyage in a Mirror 16
This article was first published in Dinghy Cruising Association Bulletin number 180/2003
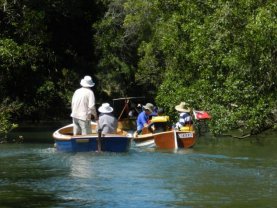
Queens Beach North, Scarborough Queensland, 11th January 1970, (midsummer almost): The day Dawned drearily, sky overcast; the last night’s sea breeze, just a whisper from the east, barely stirred the leaves of the old cottonwoods fringing the sandy beach. We had been up for hours checking our gear, the rigging and loading of our Mirror 16 beside the concrete ramp a hundred yards from the front gate.
After launching, our blue-hulled pride and joy sat somberly on the beach, just above the tide’s edge. She was newly acquired, second hand and still unnamed despite many suggestions from family and friends and known to leak a bit! Despite all efforts to reduce the mounting stash of camping gear, food and water carefully measured out, two boys and a father for four days, augmented by extra for the teenage crew of our escorting Quickcat, a 15 knot plywood, hard chine catamaran. Eventually launched after a good deal of heaving and shoving we had yet to learn of the help blow up rollers can give, our log keeper reported the time, 0955 hours already! As we headed out into our little bay snugged in between Osborne and Drury points, we hastily checked the water level in the centreboard case; thankfully it remained an inch or so below the boat’s floor. We were really floating! Our first “voyage” at last! For years past, we had come to the family’s tiny beach shack on the eastern shore of the Redcliffe Peninsula for the school holidays. Time after time we had gazed wistfully at the dark- hued Moreton Island, mysterious and beckoning, looming on the horizon just twelve or so miles across the Bay. This morning it wore a shroud of cloud.
We knew the Pacific Ocean’s surf pounded the island’s seaward shore but except in westerly weather in winter, quieter waters lapped the sand in the Bay. The tangled hills, tree clad mounds of sand, still miles away, stretched skyward with Mt. Tempest (915 ft.) the highest. At the southern end, the bare white sand of the Big Sandhills (300 ft.) and Little Sandhill (100 ft.) glimmered in the dull morning light.
Both sloop-rigged, our boats made slow progress eastward, mean course 1100 , tacking back and forth to clear the rocks off Drury point. Anxious to try our home-taught navigation skills, we took half-hourly bearings with an old Army prismatic compass. At 1030 hours, then barely a half-mile off shore, our reading was 0200 ; Garnet Rock bore 1940 and Redcliffe Water tower 2450 , Bongaree water tower on Bribie Island, 3380 . At noon, Square Patch bore 0700 but by 1330 hours the faintest breeze had died to nothing. Bored and sweltering in the hot midday sun, the relative coolness of the water (probably about 250 C), beckoned and the boys dived in and swam around the boats while father watched anxiously for a puff of wind and, even more anxiously for any sign of a shark!
After drifting almost aimlessly about the M3 buoy marking the NE end of the Four Fathom Bank and still about three miles off the island, we reluctantly started the Seagull outboard, passed a towline to our friends in the engineless Quickcat, and headed straight for the beach. We had hoped to sail all the way. An hour later, Seagull tank almost drained, we made landfall at the Tangalooma Tourist Resort. So, six hours after launching, we found a public telephone booth (no mobiles then) and phoned news of our safe arrival to those waiting at home. That duty done, we set off again slowly southwards just off the beach. We rounded Tangalooma Point, passed Ship Patch and, landing at Square Patch (another sand cliff), we climbed the steeply sloping loose sand. At last reaching the lip, puffed and pleased, we looked out on our boats on the beach below, then across the blue-grey of the shallow bay to the Peninsula (our starting point), encrusted with the houses and marked by a significant landmark (the water tower). In the boats once more, we continued slowly southwards, past the shallow Shark Spit and the beach-bound rusty and oyster covered remains of small steamers until we reached the Big Sandhill. We motored slowly over the seabed towards the shore, anchoring in waist- deep crystal clear water. At low tide much of this foreshore dries out, revealing extensive patches of seagrass liberally sprinkled with half-buried razor and turban shells and oyster clumps. We found a campsite under the She oaks just above the beach but the area seemed much used and rather “tired” – and the sandflies rose in clouds – so we opted for the much narrower beach a little further north near the wrecks we’d passed earlier.
As dusk approached we dragged the laden boats up the beach and above the high tide mark, handed the sails, stretched them between the boats as an awning, spread out our beds beneath and set about cooking our meal
(Chops, potatoes etc.) on the campfire. We had rather underestimated our water needs for the voyage so tried boiling our potatoes and rice in seawater. We enjoyed the spuds but couldn’t stomach the rice.
Rising rather later next morning, we found the sky overcast again and no wind so we struck the awning, packed our gear, and set off on foot along the beach to explore the southern end of the island. Reaching the foot of the Big Sandhills we laboriously climbed to the top and slid down the other side. To our surprise we found a fresh water soak where new piles of dung indicated the presence of brumbies. Making our way through a half-mile of brush we reached the ocean beach and spent a relaxing hour fishing (nothing caught) and surfing. Later, we set off by compass to skirt the SE corner of the sand blows (which create the sandhills) and on reaching the Bay shoreline again we retraced our steps along the beach to our campsite. A storm seemed to be brewing in the south, so we re-erected our awning and had a quick evening meal before securing our gear and turning in. Shortly afterwards at 2015 the night sky was split by bright flashes of lightning accompanied by crashes of thunder and down pelted the rain. Quickly we set our bailing buckets to catch the rain water pouring off the awning, only to find of course that the first bucket was very salty from the sea spray that the sails had collected. The subsequent buckets were drinkable, fortunately, so we were able to replenish our water bottles for the return trip home.
Next morning dawned fine and clear, so we broke camp, launched the boats and set off for home at 0805, the wind South 5 knots, course 2900 . We set the spinnaker on a makeshift pole and by 0900 we reached the confused water which in those days was marked by four beacons in a square where the shipping channel crosses a dredged sandbar. At 0930, the Cowan Cowan light bore 0290 and Redcliffe watertower 2520 . Half an hour later, we changed course to 2650 and sailed slowly over a calm sea towards home. By 1100 the wind failed and. Paddles out when the Seagull fuel finally ran out we made our way laboriously past the North Reef beacon and, tired but satisfied, reached our home beach just after noon.
So ended our first big adventure, not so much of a sailing experience, unfortunately, but an exciting one just the same – and the precursor of many more “voyages”, often very exhilarating ones in the following years.
Notes: 1. Apart from the shipping channel kept navigable by dredging, the Bay is fairly shallow, with lots of sandbanks but most remain covered at low tide so are no worry to dinghy sailors, but make things difficult for keelboats. 2. A typical summer’s day has light offshore land breezes early in the day, south-east winds 10 – 15 knots for most of the morning, dying away to a dead calm for an hour or two at midday when the air temperature may reach 300 C and then the afternoon sea breeze from the North-east sets in, mostly 15-20 knots 3. For most of the Bay the tidal streams (about 1 knot at most) can be disregarded but rising to perhaps six knots at half-tide at the North-east and South-west corners of Moreton Island.


 However, this year the Regatta Committee cut through the red-tape to get permission to clear the passage. Having dealt with Council and various government departments they then set-about clearing the passage with chainsaws. Some massive tree limbs were removed and these also had to be taken onto land for disposal. To the credit of the Committee, the passage behind Stott’s is now a navigable waterway with only one caution-point. So we did the “African Queen” thing through the passage line-of-file and some boats also did the return journey.
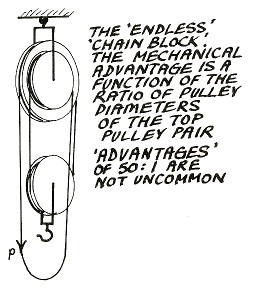
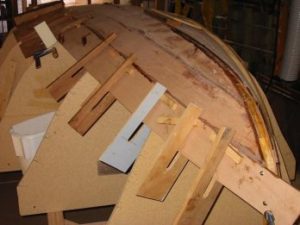 The boat is built of 6mm (1/4″) Pacific Maple ply. The planking stockof four sheets were made into two 4.8m. long sheets by scarfing two 2.4m. sheets end to end. This resulted in two rather unwieldy sheets from which the strakes were cut two at a time. The system I adopted was to make a template for each pair of strakes. A batten was nailed to the moulds at the line of the next strake. This and the edge of the already fitted strake were used to mark the template, then on the template material a line parallel and 15mm away from the fitted strake line was scribed to allow for the lap. When the template fitted comfortably on the moulds, its outline was transferred to the two long sheets of planking stock and two strakes were cut out together. I found that I could cut to a line more easily and accurately with a handsaw rather than using a low set circular saw or a jigsaw.
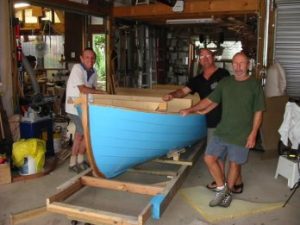 “It’s much bigger than I expected” was my first impression. It looked much smaller upside down. The building frame was modified to support the boat. Legs were replaced with wheels to enable it to be moved about the shed. I created a problem for myself by removing several of the moulds without marking their position of the boat. Had this been done it would have been easier to site the centreboard, thwarts and mast positions.
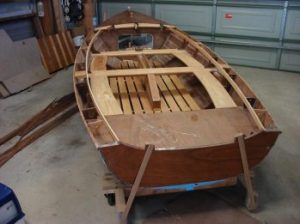 At this stage it looked finished but still to come were: – the rudder, a curved laminated tiller and tiller extension, a tapered hollow “birds mouth” mast, tapered solid spars. The trailer had to be modified to fit the boat, the sails made and all the rigging fitted.
 Dixon Kemp (1839-1899) was an English naval architect and an authority on sailing and yacht stability. He was also sailing editor of “The Field” magazine – a country magazine with a strong leaning to outdoor sports. It is one of the world’s longest-running magazines. Kemp was a founder and the first Secretary of the Yacht Racing Association (now Royal) and became a founder and member of the board of the Yacht Registration Society in 1877. Ten years later he wrote a review “50 Years of Yacht Building” for the Institute of Naval Architects and subsequently wrote and regularly updated several books on yacht design, yacht architecture and practical boat building, as well as the Manual. The latter saw seven revisions in his lifetime and a further 25 to this day. You can buy updated facsimile and digitized versions on Amazon. com – even hardback and paperback editions.
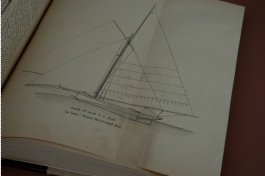 Kemp designed a number of famous yachts of the day and was very influential in introducing improvements to yacht measurement rules and in the (eventual) establishment of the Lloyds Classification of Yachts in 1906. His books show among other interesting trends, the rise of eighteen footer sin the 19th century – the trailing edge of technology perhaps? Another context of the book is the contemporary raging competition over the America’s Cup, which had been interrupted by the American Civil War. My heirloom copy of the 1880 Manual has been carted from one end of Australia to the other. In Canberra almost 40 years ago, I gave it
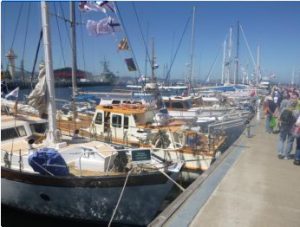
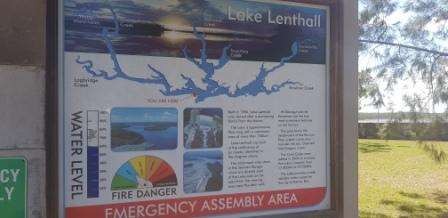
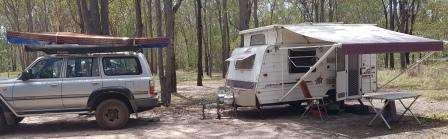
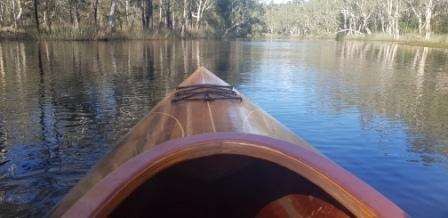
 The water holes are only very short billabong type permanent waterholes surrounded by paper bark trees. The main forestry roads are corrugated and a little rough but there are many other tracks around and some lead to remote launching spots around the banks of Lake Lenthall. 4×4 is not required but is recommended. I launched the kayak most days for morning and afternoon paddles covering most of the lake over the 5 day stay.
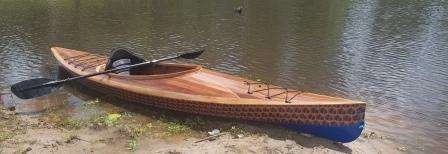
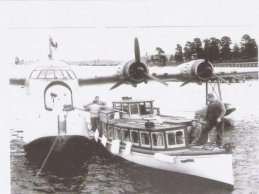 On June 30 this year a handsome 35 ft fantail motor launch named “Nancy” slipped into the Noosa River, just 95 years after she was first launched at Hobart.