


“Never build an ugly boat” is good advice when choosing the design of a boat. There are so many lovely designs that a choice is difficult. I wanted a boat that sailed well, was small enough to sail solo and yet large enough to comfortably take another adult or a couple of grandchildren. Although I had never seen a “Gannet” I liked the look of the Iain Oughtred boats I had seen. The “Gannet” seemed to fit the bill. It is 4.4 m. (14?5″) long, beam of 1.73m. (5?8″), sail area 10.96 sq. m. (118sqft).
The plans are in imperial measurements with metric conversions. They come with full sized mould, stem and transom plans, with a set of 1: 8 offset, construction and spar plans and with 1:16 sail plans. There is a list of scantlings and copies of some pages of Oughtred’s “Clinker Plywood Boatbuilding Manual”. This book was my most frequent reference. The working plans were photocopied and laminated. They were kept beside the boat, together with pencil, paper and an imperial scale ruler for the whole 20 months. The plans are clearly drawn, with clear fine detail in imperial measurement with metric conversions. I endorse the advice I was given to build using imperial measurements, as the metric conversions are not all accurate.
Perhaps the most pleasant discovery was the camaraderie of fellow wooden boat builders. Their generosity, encouragement, advice and hands on help were most appreciated.
The moulds were made of 12mm chipboard. From the full-sized plans of the moulds, the strake landing marks, as well as the laps, and DWL marks were carefully transferred onto the moulds with a spike, and clearly pencilled before being cut with a jig saw. All these marks were kept clearly marked on the finished mould. The building frame was made a little higher than designed so that I could wriggle underneath to inspect the inside of the boat while under construction. Despite making work around the keel and lower (upper when upside down) strakes a bit more difficult, it proved to be a worthwhile decision.
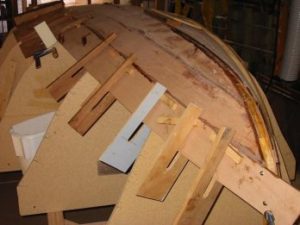 The boat is built of 6mm (1/4″) Pacific Maple ply. The planking stockof four sheets were made into two 4.8m. long sheets by scarfing two 2.4m. sheets end to end. This resulted in two rather unwieldy sheets from which the strakes were cut two at a time. The system I adopted was to make a template for each pair of strakes. A batten was nailed to the moulds at the line of the next strake. This and the edge of the already fitted strake were used to mark the template, then on the template material a line parallel and 15mm away from the fitted strake line was scribed to allow for the lap. When the template fitted comfortably on the moulds, its outline was transferred to the two long sheets of planking stock and two strakes were cut out together. I found that I could cut to a line more easily and accurately with a handsaw rather than using a low set circular saw or a jigsaw.
Handling a 14ft, 6mm wobbly strake is quite difficult when working by yourself. It is easy to have an uncontrolled epoxy-covered edge going all over the place. I found it helpful to remove the temporary baton and inset nails in the moulds at the plank landing points. The strake would sit on these while I applied clamps and fixed the stem and stern ends with temporary button-head screws. All screws were removed the next morning before the epoxy got too strong. Cutting a gain on the strake once fixed on the boat was difficult, as the edge flexed. It was better to cut the gain before fitting the strake and better still cut a half gain on the upper and lower edges of each strake with a router jig. Fitting the Garboard strake took the longest. It was the first. Things improved. Planking was completed in six weeks – three weeks for the first three strakes and five strakes in the next three weeks.
A laminated false stem was built on the plastic covered stem in three stages, gluing 3-4 laminates at a time. At each stage dowels were used to stop the glued laminates from slipping about. Next day the dowels were cut flush and the process repeated. Once the false stem was well cured it was removed from the boat, shaped on the bench and then fitted to the boat. The keel was fitted in scarfed sections to encompass the centreboard slot. A tapered 20 x 12mm. square-sectioned rubbing strip was glued to the upper outer edge of the sheer. Months later the deck was fitted and trimmed with a router to this edge before the outer wider laminate of the rubbing strip was fixed to cover both this strip and the ply edge.
Painting
All the lap fillets were sanded or filled as needed. 40 grit sand paper is good for removing hard old epoxy. The timber hull was painted with TPRDA modified epoxy and the boat was sanded to 180 grit, before applying 2 coats of epoxy undercoat. At this point it looked as if it was painted with dilute milk. Final sanding to 240 grit was done before the finishing coats were applied. Painting is not my favourite pastime and I was somewhat hesitant about using Boat Cote. The instructions were read and re-read. The technique used was to quickly apply a thin coat of paint with a roller to a 300mm section of the boat then tipping it off with a foam brush before further paint was applied. After each roller application, the paint pot and roller were sprayed with a mist of water. By the time I got around the boat it was dry enough for a second coat to be applied. The next morning using the same technique I applied three more coats without stopping. The resulting finish (5 coats) was better than I had expected.
The Turn Over
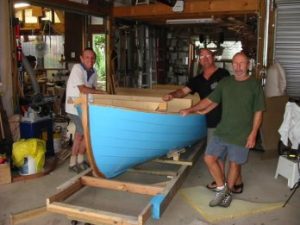 “It’s much bigger than I expected” was my first impression. It looked much smaller upside down. The building frame was modified to support the boat. Legs were replaced with wheels to enable it to be moved about the shed. I created a problem for myself by removing several of the moulds without marking their position of the boat. Had this been done it would have been easier to site the centreboard, thwarts and mast positions.
From this point on progress seemed to slow, much to the frustration of friends who were concerned that they might never see it in the water.
Centreboard case
Both sides of the centreboard were glassed before assembly. The centreboard spacers covered with epoxy were too slippery to site accurately until fixed with small stainless steel nails using a nailing gun. Two floors are fitted through the fore and aft ends of the centreboard case. They were not glued into position until the centreboard case was fitted to the boat. (Floors not only act as floor joists but strengthen the boat by being fixed to the keel, centreboard case and strakes 2&3. There is no attachment to the garboard stake so as not to impede the drainage of bilge water.) The board itself was shaped. Three 1 kg sections of lead were inserted, two at the lower end and one at the upper aft end of the board. I thought that the resulting components of force would be more effective in keeping the board down than having all the weight at the lower end of the board. It works well. Lead poured into a soft drink can is the same diameter as a 64mm hole saw cut. This is an easy way to insert a weight. The board was fitted with a brass leading edge and then glassed.
The sides of the centreboard fit into the upper half of the keel slot. It, with its associated floors, was fixed into position with epoxy. The centreboard logs were not fitted at the same time. At the middle of the CB logs there are half floors (they can? t go through the CB case). I attached these half floors to the logs before fitting the logs (mistake!).Each log was fitted on a different day in order to keep the established position of the bolt hole in the case. The starboard log was fitted first, clamped fore and aft to the CB case and a prop to the ceiling used to hold down the floor onto the strakes. When this was finished I noticed the prop was distorting the hull. It was removed while the epoxy was still fluid. At the time I was not aware that this allowed the lower edge of the log to move away from the lower edge of the CB case. Air was entrained through the bolt hole in the centreboard case creating a longitudinal space that was to cause a mysterious leak after launching. It was only by removing the log (no small job) and floating in a new one in a sea of epoxy that the problem was fixed.
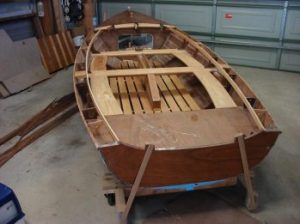
Internal Fit out
The forward and middle thwarts are fitted to support the centreboard case. The mast partner sits on the forward thwart and is supported through to the keel.
I planned for the forward deck to finish in front of the forward thwart to allow crew access in front of the mast. The decked area is from the second mould station forward. This creates a dry storage area up front and buoyancy at the bow. Aft there is further storage/buoyancy formed by replacing the aft thwart with deck to sit on and a bulkhead. 6 “,150 mm side decks run from the fore deck to the stern. Framing all these sections took some time. The inside of the fore and aft hatch areas were painted white before the decks were fitted. On a bright day it is very difficult to see inside a dark coloured compartment.
Before the side decks were fitted the inside of the boat was painted. The colour “Sand” achieved the aim of not being too hot or too glary. Painting the inside was more fiddly than the outside. It was all done with a brush. Finally the side decks and the outer rubbing strips were fitted. The fore deck, side decks, stem and transom were clear finished.
 At this stage it looked finished but still to come were: – the rudder, a curved laminated tiller and tiller extension, a tapered hollow “birds mouth” mast, tapered solid spars. The trailer had to be modified to fit the boat, the sails made and all the rigging fitted.
I named the boat “Cetonia” in memory of my boyhood experience with boats. Uncle Bert (Brier), a naval architect, had a large chest of drawers full blue printed boat plans. I remember being impressed by the plans of a car ferry, which I think, was to become the “James Holt” car ferry. He had designed for his own use a yacht, “Cetonia” which was built by Harrold Spring at Breakfast Creek. Sadly WW2 prevented him fulfilling his use of the boat.
A large group of family and friends came to the launch. There was a nice breeze on the day. The boat handles well. The skipper was and still is happy.